在一次面试过程中,面试官问了我mybatis的原理和工作过程,当时没有回答出来,现在边调试,边记录下
基础
在springmvc使用中,我相信大家对其中的web.xml中配置都很熟悉,特别是ContextLoaderListener
和DispatcherServlet
我们先来看下 ContextLoaderListener 类的层次结构
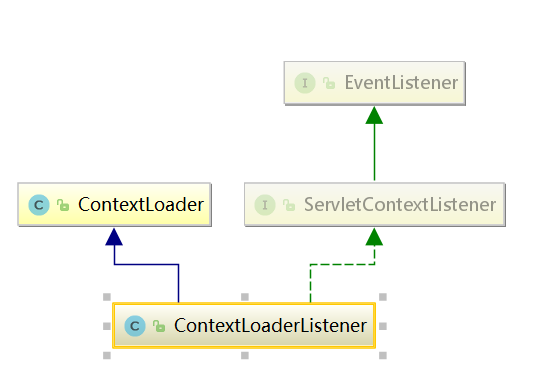
从中我们发现 其继承了 ContextLoader 和实现了 ServletContextListener
现在我们就先从 ContextLoader入手 既然 ContextLoaderListener实现了ServletContextListener,我们知道ServletContextListener我们知道是web容器创建的时候开始执行contextInitialized() 方法,该方法中调用了 initWebApplicationContext(初始化WebApplicationContext对象)方法,
initWebApplicationContext 解析:
       //首先判断servletContext中是否存在WebApplicationContext实例,如果存在说明ServletContextListener在web.xml中多次声明,并抛出异常。
        if (servletContext.getAttribute(WebApplicationContext.ROOT_WEB_APPLICATION_CONTEXT_ATTRIBUTE) != null) {
                   throw new IllegalStateException("Cannot initialize context because there is already a root application context present - check whether you have multiple ContextLoader* definitions in your web.xml!");
               } else {
                   Log logger = LogFactory.getLog(ContextLoader.class);
                   servletContext.log("Initializing Spring root WebApplicationContext");
                   if (logger.isInfoEnabled()) {
                       logger.info("Root WebApplicationContext: initialization started");
                   }
                   long startTime = System.currentTimeMillis();
                   try {
                       if (this.context == null) {
                           //调用 createWebApplicationContext() 方法创建WebApplicationContext实例
                           this.context = this.createWebApplicationContext(servletContext);
                       }
                       if (this.context instanceof ConfigurableWebApplicationContext) {
                           ConfigurableWebApplicationContext cwac = (ConfigurableWebApplicationContext)this.context;
                           if (!cwac.isActive()) {
                               if (cwac.getParent() == null) {
                                   ApplicationContext parent = this.loadParentContext(servletContext);
                                   cwac.setParent(parent);
                               }
                               //调用configureAndRefreshWebApplicationContext() 方法通过WebApplicationContext进行解析web.xml中配置的applicationContext.xml
                               this.configureAndRefreshWebApplicationContext(cwac, servletContext);
                           }
                       }
                       //把WebApplicationContext实例添加到ServletContext中
                       servletContext.setAttribute(WebApplicationContext.ROOT_WEB_APPLICATION_CONTEXT_ATTRIBUTE, this.context);
createWebApplicationContext 方法:
            protected WebApplicationContext createWebApplicationContext(ServletContext sc) {
                    // 获取WebApplicationContext class实例
                    Class<?> contextClass = this.determineContextClass(sc);
                    if (!ConfigurableWebApplicationContext.class.isAssignableFrom(contextClass)) {
                        throw new ApplicationContextException("Custom context class [" + contextClass.getName() + "] is not of type [" + ConfigurableWebApplicationContext.class.getName() + "]");
                    } else {
                        // 返回WebApplicationContext对象
                        return (ConfigurableWebApplicationContext)BeanUtils.instantiateClass(contextClass);
                    }
                }
determineContextClass 方法
             protected Class<?> determineContextClass(ServletContext servletContext) {
                 String contextClassName = servletContext.getInitParameter("contextClass");
                 //判断 servletContext中是否存在contextClass
                 if (contextClassName != null) {
                     try {
                         return ClassUtils.forName(contextClassName, ClassUtils.getDefaultClassLoader());
                     } catch (ClassNotFoundException var4) {
                         throw new ApplicationContextException("Failed to load custom context class [" + contextClassName + "]", var4);
                     }
                 } else {
                     //从defaultStrategies中通过WebApplicationContext全类名(包名和类名)获取要实现WebApplicationContext接口的类
                     contextClassName = defaultStrategies.getProperty(WebApplicationContext.class.getName());
                     try {
                         return ClassUtils.forName(contextClassName, ContextLoader.class.getClassLoader());
                     } catch (ClassNotFoundException var5) {
                         throw new ApplicationContextException("Failed to load default context class [" + contextClassName + "]", var5);
                     }
                 }
             }    5. 配置环境变量
[root@localhost ~]# vim /etc/profile
在末尾加入这么一行即可:export PATH=$PATH:/usr/local/erlang/bin
更新配置文件:[root@localhost ~]# source /etc/profile
更新之后在任意地方输入erl能进入命令行, 那么就说明配置成功了。